Critical Section |
| A critical section is an object to exchange information among threads. To create a critical section the program must call ::InitializeCriticalSection. When the program does not need the critical section, the program must call ::DeleteCriticalSection. There are three main functions of a critical section: ::EnterCriticalSection, ::LeaveCriticalSection, and ::TryEnterCriticalSection. See example below. Una sección crítica es un objeto para intercambiar información entre threads. Para crear una sección crítica el programa debe llamar ::InitializeCriticalSection. Cuando el programa ya no necesita la sección crítica, el programa debe llamar ::DeleteCriticalSection. Hay tres funciones principales de una sección crítica: ::EnterCriticalSection, ::LeaveCriticalSection y ::TryEnterCriticalSection. Ver el ejemplo de abajo. |
Critical Sections with Wintempla |
| In order to simplify multi-thread applications, it is possible to create a simple class for the critical section. Wintempla provides the class Mt::CriticalSection. A multi-thread program must have one CriticalSection (the cs variable in the code below) for each variable that will be used from more than one thread. Each thread must call cs.Enter() before using the variable. After using the variable, the thread must call cs.Leave() so that other threads can use the variables, see code below. A fin de simplificar las aplicaciones multi-tarea, es posible crear una clase simple para la sección crítica. Wintempla proporciona la clase Mt::CriticalSection. Un programa multi-tarea debe tener una CriticalSection (la variable cs en el código de abajo) por cada variable que se usará desde más de una thread. Cada thread debe llamar cs.Enter() antes de usar la variable. Después de usar la variable, la thread debe llamar cs.Leave() para que otras threads puedan usar la variable, vea el código de abajo. |
Enter (::EnterCriticalSection) and Leave (::LeaveCriticalSection) |
| When a thread wants to read or write one of more exchange variable, it must call the ::EnterCriticalSection API. Then, the thread can be read or write the values of one of more exchange variables. ::The EnterCriticalSection API ensures that only one thread is in a critical section. When the thread has read or written the exchange variable, it must call ::LeaveCritialSection. Cuando una thread quiere leer o escribir una variable de intercambio, ésta debe llamar la API ::EnterCriticalSection. Entonces, la thread puede leer o escribir los valores de una o más variables de intercambio. La API ::EnterCriticalSection asegura que solamente una thread se encuentra en la sección crítica. Cuando una thread ha leído o escrito las variables de intercambio, ésta debe llamar ::LeaveCriticalSection |
| Problem 1 |
| Indicate what is the main advantage of creating a class for the critical section. Indique cual es la ventaja principal de crear una clase para la sección crítica. |
Thread Safe Variables |
A thread safe variable is a variable that can be used from several threads. Wintempla provides a set of classes to simplify the use of thread safe variables. These classes are:
Una variable segura para threads es una variable que puede ser usada desde varias threads. Wintempla proporciona un conjunto de clases para simplificar el uso de variables seguras para threads.
|
| Program.h |
| class Program : public Win::Dialog, public Mt::IThread { public: Program() { balance.Set(0.0); } ~Program() { } Mt::DoubleTs balance; HANDLE handle; static unsigned WINAPI FuncTH(LPVOID param); ... }; |
| Program.cpp |
void Program::Window_Open(Win::Event& e) { handle = _beginthreadex(NULL, 0, FuncTH, this, 0, NULL); } void Program::btBuy_Click(Win::Event& e) { balance.Set(-10.1); } void Program::btSell_Click(Win::Event& e) { balance.Set(20.2); } unsigned WINAPI Program::FuncTH(LPVOID param) { Program* program = (Program*)param; balance.Set(b33.2); . . . } |
| Tip |
| If one thread tries to enter a critical section that other thread has entered, this thread will be stop until the critical section becomes available. Thus, a critical section must have very few lines and must try to exchange the minimum amount of information among threads. Si una thread trata de entrar una sección crítica que otra thread ha entrado, esta thread se detendrá hasta que la sección crítica esté disponible. Así, una sección crítica debe tener muy pocas líneas y debe tratar de intercambiar la cantidad mínima de información entre las threads. |
| Tip |
| The code below shows the implementation of the Mt::IntTs class. As you can see, the class has two member variables: an integer value and a critical section. When a thread wants to set the value of the integer value, the class calls the ::EnterCriticalSection API. The integer value is stored in the integer member variable, and then the ::LeaveCriticalSection is called. El código de abajo muestra la implementación de la clase Mt::IntTs. Como usted puede ver, la clase tiene dos variables miembro: un valor entero y una sección crítica. Cuando una thread quiere fijar el valor del valor entero, la clase llama la API ::EnterCriticalSection. El valor entero es almacenado en la variable miembro entera, y entonces se llama ::LeaveCriticalSection. |
| Wintempla.h |
| ... //____________________________________________________________Int class IntTs // int Thread Safe { public: IntTs(void) { value = 0; ::InitializeCriticalSection(&cs); } ~IntTs(void) { ::DeleteCriticalSection(&cs); } void Set(int value) { ::EnterCriticalSection(&cs); this->value = value; ::LeaveCriticalSection(&cs); } int Get(void) { int b; ::EnterCriticalSection(&cs); b=value; ::LeaveCriticalSection(&cs); return b; } bool SetTry(int value) { if (::TryEnterCriticalSection(&cs)==0) return false; this->value = value; ::LeaveCriticalSection(&cs); return true; } bool GetTry(int& value) { if (::TryEnterCriticalSection(&cs)==0) return false; value=this->value; ::LeaveCriticalSection(&cs); return true; } private: int value; CRITICAL_SECTION cs; }; |
Try (::TryEnterCriticalSection) |
| As CPU time is wasted every time a thread is waiting to enter a critical section. The program must call ::TryEnterCriticalSection instead. The main difference between ::EnterCriticalSection and ::TryEnterCriticalSection is that ::EnterCriticalSection waits until the critical section become available, while ::TryEnterCriticalSection waits briefly and continues working if the critical section does not become available. ::TryEnterCriticalSection can greatly improve the performance of a multi-thread program. Como tiempo del CPU se desperdicia cada vez que una thread espera para entrar una sección crítica. El programa puede llamar en su lugar a ::TryEnterCriticalSection. La diferencia principal entre ::EnterCriticalSection y ::TryEnterCriticalSection es que ::EnterCriticalSection espera hasta que la sección crítica se desocupa, mientras que ::TryEnterCriticalSection espera brevemente y continúa trabajado si la sección crítica no se desocupa. ::TryEnterCriticalSection puede mejorar en forma considerable el desempeño de un programa multi-tarea. |
Dead Locks |
| When a multi-thread program becomes unresponsive, it is because the programmer did not correctly structure the exchange variables of the program. A dead lock is produced when there is conflict among the threads of the program. For instance, a thread in waiting on a thread that is blocked and there is no way to unblock it. Cuando un programa multi-tarea deja de responder, es porque el programador no estructuro en forma correcta las variables de intercambio del programa. Un candado muerto se produce cuando hay un conflicto entre las threads de un programa. Por ejemplo, una thread está esperando a una thread que está bloqueada y no hay forma de desbloquearla. |
::PostMessage |
| ::PostMessage can used to send notification from a working thread to the main thread (the thread of the main Window). ::PostMessage is extremely useful because it can be used to notify the main thread when a worker thread is about to complete some processing. Microsoft Windows provides a set of messages that can be used for the application: WM_APP+1, WM_ APP +2, WM_ APP +3,... etc. You usually will call ::PostMessage at the end of the thread function to notify the main thread that the thread is about to end. If you post a WM_ APP +1, then the event Window_App1 will be eventually called. You can safely call ::WaitForSingleObject from Window_User1 preventing the main thread to be suspended or be suspended for a long time. ::PostMessage puede ser usado para enviar notificaciones desde una thread de trabajo a la thread principal (la thread de la Ventana). ::PostMessage es extremadamente útil porque este puede usarse para notificar a la thread principal cuando una thread de trabajo está a punto de terminar algún procesamiento. Microsoft Windows proporciona una conjunto de mensajes que pueden ser usados por el programa: WM_ APP +1, WM_ APP +2, WM_ APP +3,... etc. Usted usualmente llamará ::PostMessage al final de la función de la thread adicional para notificar a la thread principal que la thread está a punto de terminar. Si usted postead un WM_ APP +1, entonces el evento Window_App1 se ejecutará eventualmente. Usted puede llamar en forma segura ::WaitForSingleObject desde Window_User1 previniendo a la thread principal ser suspendida o ser suspendida por un tiempo muy largo. |
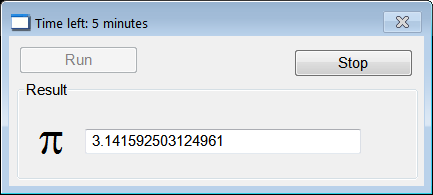
| Problem 2 |
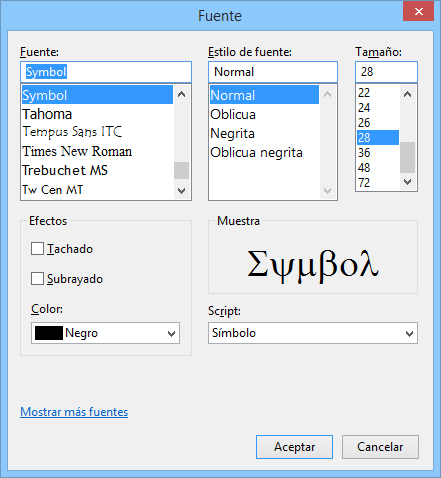
| Create a Wintempla Dialog application called PiComputation to estimate the value of pi using Wallis formula. Edit the the GUI as shown. To display the symbol of PI use a label with a "p" with the Symbol font. Cree una aplicación de Dialogo usando Wintempla llamada PiComputation para estimar el valor de pi usando la fórmula de Wallis. Edite la interface gráfica como se muestra. Para mostrar el símbolo de PI se use una etiqueta con una "p" con la fuente de Symbol. |

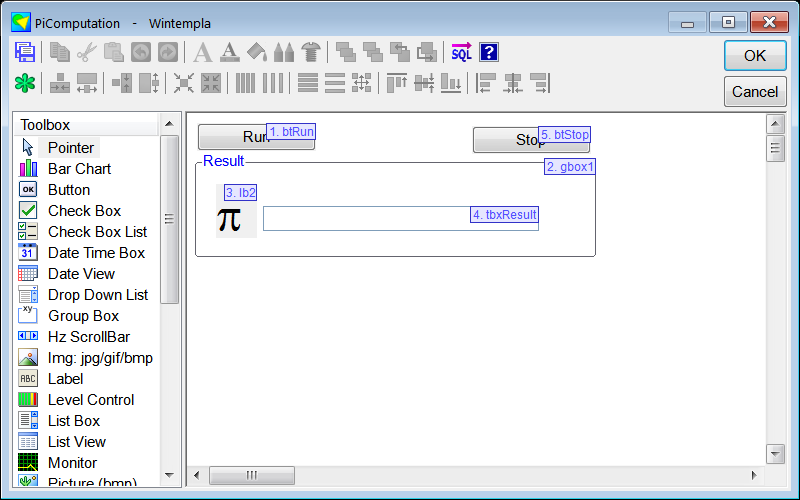
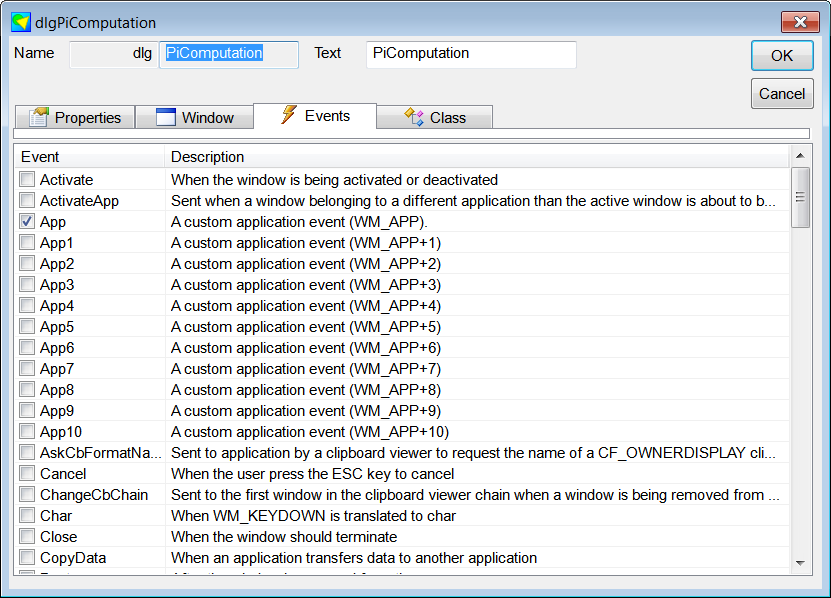
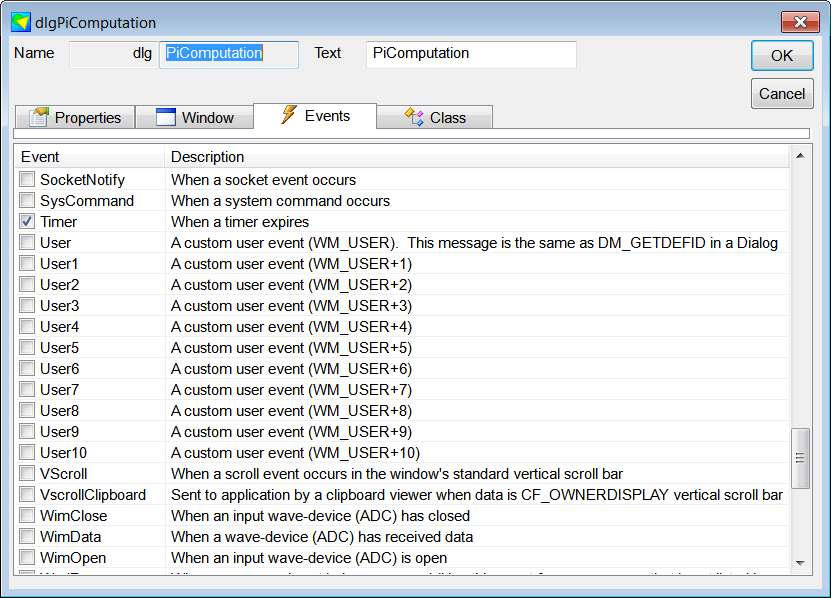
| Step A |
| Open Wintempla and double click in the interface to open the Dialog properties. Open the Events tab, and check the Timer and User events. When done, close Wintempla. The timer will run periodically to report the status of the worker thread. You must check the status of the working thread sporadically. In this example, the working thread will post a App message (WM_APP) to notify the main thread that work has been completed. Abra Wintempla y haga doble clic en la interface para abrir las propiedades del dialogo. Abra la pestaña de eventos, y marque los eventos de Timer y User. Cuando termine, cierre Wintempla. El timer se ejecutará en forma periódica para reportar el estado de la worker thread. Usted debe checar el estado de la working thread en forma esporádica. En este ejemplo, la working thread posteará un mensaje de App (WM_APP) para notificar a la thread principal que el trabajo ha sido terminado. |
| Step B |
| Edit the files PiComputation.h and PiComputation.cpp. Modifique los archivos PiComputation.h y PiComputation.cpp. |
| PiComputation.h |
| #pragma once //______________________________________ PiComputation.h #include "Resource.h" #define WORK_ID 100 class PiComputation: public Win::Dialog { public: PiComputation() { } ~PiComputation() { } Mt::CriticalSection cs; Mt::Thread thread; double valuePi = 0.0; bool cancel = false; static unsigned WINAPI ComputePi(LPVOID param); //____________________________________________ To estimate progress Sys::LowResStopwatch stopwatch; double progress = 0.0; . . . }; |
| PiComputacion.cpp |
| . . . void PiComputation::Window_Open(Win::Event& e) { this->btStop.Enabled = false; } void PiComputation::btRun_Click(Win::Event& e) { this->timer.Set(1, 1000); this->btRun.Enabled = false; this->btStop.Enabled = true; this->EnableCloseButton(false); this->cancel = false; this->progress = 0.0; this->valuePi = 0.0; stopwatch.Start(); thread.handle = (HANDLE)_beginthreadex(NULL, 0, ComputePi, this, 0, NULL); } void PiComputation::btStop_Click(Win::Event& e) { cs.Enter(); cancel = true; cs.Leave(); } void PiComputation::Window_Timer(Win::Event& e) { if (thread.IsStillActive()) { //___________________________________________ 1. Thread communication double prog = 0.0; double pi = 0.0; cs.Enter(); prog = progress; pi = valuePi; cs.Leave(); //___________________________________________ 2. Display progress wchar_t text[256]; stopwatch.GetProgressInfo(prog, text, 256); this->Text = text; //___________________________________________ 3. Display value of pi so far _snwprintf_s(text, 256, L"%.15f", pi); tbxResult.Text = text; } } unsigned WINAPI PiComputation::ComputePi(LPVOID param) { PiComputation* p = (PiComputation*)param; double sum=0; const size_t maxIterations = 1000000000; for (size_t i =0, j = 0; i < maxIterations; i++, j++) { //___________________________________________ 1. Perform calculation if (i%2 == 0) sum += (1.0/(2*i+1)); else sum -= (1.0/(2*i+1)); //___________________________________________ 2. Thread communication if (j == 10000) { j = 0; p->cs.Enter(); p->valuePi = 4*sum; if (p->cancel == true) break; p->progress = (100.0*i)/maxIterations; p->cs.Leave(); } } ::PostMessage(p->hWnd, WM_APP, (WPARAM)0, (LPARAM)WORK_ID); // Notify the main thread that we are done! return 0; } void PiComputation::Window_App(Win::Event& e) { if (e.lParam == WORK_ID) { //____________________________________________ 1. Worker thread has completed this->timer.Kill(1); // Stop the timer thread.WaitForExit(); // Wait until the thread completes this->btRun.Enabled = true; this->btStop.Enabled = false; this->timer.Kill(1); // Stop the timer this->Text = L"Done"; this->EnableCloseButton(true); //____________________________________________ 2. Display value of pi wchar_t text[256]; _snwprintf_s(text, 256, L"%.15f", valuePi); tbxResult.Text = text; // _snwprintf_s(text, 256, L"%.1f sec", stopwatch.GetSeconds()); this->Text = text; } } |
| Problem 3 |
| In the previous problem, explain why the thread communication is not performed at each iteration. En el problema anterior, explique porque la comunicación con la thread no se realiza en cada iteración. |
| Tip |
| Comments on Window_Open: The function disables the Stop button. Comentarios sobre Window_Open: la función deshabilita el botón de Stop. |
| Tip |
| Comments on btRun_Click: The function begins by starting a timer that will call the Window_Timer function every second. Then, the Run button is disabled while the Stop button is enabled. The close button of the dialog is disabled so that the user cannot close the program while the program is performing the computation. Finally, a new thread is created when _beginthreadex. Comentarios sobre btRun_Click: la función comienza por iniciar un timer que llamará la función Window_Timer cada segundo. Entonces, se deshabilita el botón de Run mientras que el botón de Stop se habilita. El botón para cerrar el diálogo se deshabilita para que el usuario no pueda cerrar el programa mientras el programa realiza los cálculos. Finalmente, la nueva thread es creada cuando se llama la función _beginthreadex. |
| Tip |
| Comments on btStop_Click: When the user press the Stop button, the exchange variable called cancel is set to true to notify the worker thread that the user wants the worker thread to stop. Comentarios sobre btStop_Click: Cuando el usuario presiona el botón de Stop, la variable de intercambio llamada cancel es fijada en falso para notificar a la worker thread que el usuario quiere detenerla. |
| Tip |
| Comments on Window_Timer: This function is automatically called by the operating system every second. Thus, every second the program display progress information on the title of the dialog and updates the value of pi in the respective textbox. Comentarios sobre Window_Timer: Esta función es llamada por el sistema operativo en forma automática cada segundo. Así cada segundo, el programa muestra la información de progreso en el título de diálogo y actualiza el valor de pi en la caja de texto respectiva. |
| Tip |
| Comments on Window_App: This function is called when the worker thread calls ::PostMessage. The program waits for the worker thread to exit, restores the buttons, and kills the timer. Comentarios sobre Window_App: Esta función es llamada cuando la worker thread llama ::PostMessage. El programa espera a que la worker thread termine, restablece los botones y detiene el timer. |
| Tip |
| Comments on ComputePi: The function has a main for-loop to perform the calculations. Inside this for-loop the function checks the value of the exchange variable called cancel. If the value is true, the for-look is broken. Inside this for-loop, the value progress of the computation and the estimate of pi are ocasionally updated. Comentarios sobre ComputePi: La función tiene un ciclo-for principal para realizar los cálculos. Dentro de este ciclo-for la función checa el valor de la variable de intercambio llamada cancel. Si el valor es verdadero, el ciclo-for se interrumpe. Dentro de este ciclo-for, el valor del progreso del cálculo y el estimado de pi son ocasionalmente actualizados. |
MUTEX (MUTual EXclusion) |
A mutex is similar to a critical section; it allows only one thread at a time access some resource. The main difference between a mutex and a critical section is that the mutex can be shared among several processes (programs) using a name to identify it. However, critical sections are faster than mutex. You may inspect the Mt::Mutex class to learn more about a mutex. The main functions are:
Un mutex es similar a una sección crítica, este permite a una sola thread a la vez tener acceso a un recurso. La diferencia principal entre un mutex y una sección crítica es que el mutex puede ser compartido entre varios procesos (programas) usando un nombre para identificarlo. Sin embargo, las secciones críticas son más rápidas que los mutex. Usted puede inspeccionar la clase Mt::Mutex para aprender más sobre los mutex. Las principales funciones son:
|
Semaphore |
It allows sharing simultaneously a resource by a maximum number of threads (or processes).You may inspect the Mt::Semaphore class to learn more about semaphores. The main functions are:
Este permite compartir en forma simultánea un recurso por un número máximo de threads (o procesos). Usted puede inspeccionar la clase Mt::Semaphore para aprender más sobre los semáforos. Las principales funciones son:
|
| Tip |
| The following tables show a comparison of several synchronization objects. Las siguientes tablas muestran una comparación entre varios objetos de sincronización. |
| Name | Critical Section | Mutex | Semaphore |
| Kernel object | NO | YES | YES |
| Good performance | YES | NO | NO |
| Can be shared among threads | YES | YES | YES |
| Can be shared among processes | NO | YES | YES |
| Description | Critical section | Mutex | Semaphore |
| Create | ::InitializeCriticalSection | ::CreateMutex | ::CreateSemaphore |
| Delete | ::DeleteCriticalSection | ::CloseHandle | ::CloseHandle |
| Open existing | --- | ::OpenMutex | ::OpenSemaphore |
| Acquire lock | ::EnterCriticalSection | ::WaitForSingleObject | ::WaitForSingleObject |
| Release lock | ::LeaveCriticalSection | ::ReleaseMutex | ::ReleaseSemaphore |
USER mode vs KERNEL mode |
| A program can be running in USER mode or KERNEL mode. A program runs faster in USER mode than in KERNEL mode. Additionally, it is expensive to switch from one mode to the other. Therefore, you should try to use the Interlocked functions and critical sections instead of mutexes and semaphores. Un programa puede ser ejecutado en el modo de USER o en el modo de KERNEL. Un programa se ejecuta más rápido en el modo de USER que en el modo de KERNEL. Adicionalmente, es caro cambiar de un modo a otro. Por lo tanto, usted debe tratar de usar las funciones Interlocked y las secciones críticas en lugar de los mutexes y los semáforos. |
C++ 11 mutex |
| Starting in version 11, the language C++ supports for mutex and shared mutex. It defines a set of classes to create a mutex and obtain exclusive access to a resource. A mutex is similar to a critical section. The program below shows how to use a mutex to get exclusive access to the variable a. A partir de la versión 11, el lenguaje C++ suporta: mutex and shared mutex. Este define un conjunto de clases para crear un mutex y obtener acceso exclusivo a un recurso. Un mutex es similar a una sección crítica. El programa de abajo muestra cómo usar un mutex para conseguir acceso exclusivo a la variable a |
| Program.cpp |
| #include <mutex> //#include <shared_mutex> void Program::SomeFunction() { std::mutex mx; double a = 100.7; //_____________________________________ method 1 { std::lock_guard<std::mutex> lock(mx); a += 10; } //_____________________________________ method 2 mx.lock(); a += 10; mx.unlock(); } |
| Problem 4 |
| Create a Wintempla Dialog application called PiC11 to estimate the value of pi using Wallis formula using only C++ multithreading support instead of Microsoft Windows multithreading. C++ will use Microsoft Windows multithreading functions in the background. The main advantage of using C++ functions is that is the same code will run on any compiler that support C++ 11 or later. Edit the GUI as shown or just copy the GUI from problem 1. To display the symbol of PI use a label with a "p" with the Symbol font. Cree una aplicación de Dialogo usando Wintempla llamada PiComputation para estimar el valor de pi usando la fórmula de Wallis usando solamente C++ multithreading sin usar Microsoft Windows multithreading. C++ usará las funciones de Microsoft Windows multithreading por debajo. La diferencia principal de usar las funciones de C++ es que el mismo código correrá en cualquier compilador que soporte C++ 11 o posterior. Edite la interface gráfica como se muestra o sólo copie la GUI del problema 1. Para mostrar el símbolo de PI se use una etiqueta con una "p" con la fuente de Symbol. |
| PiC11.h |
| #pragma once //______________________________________ PiC11.h #include "Resource.h" #include <thread> #include <atomic> #include <mutex> #define WORK_ID 100 class PiC11: public Win::Dialog { public: PiC11() { } ~PiC11() { } std::mutex cs; std::thread th; double valuePi = 0.0; bool cancel = false; static void ComputePi(HWND hWnd, bool & cancel, double& progress, double& valuePi, std::mutex& cs); //____________________________________________ To estimate progress Sys::LowResStopwatch stopwatch; double progress = 0.0; . . . }; |
| PiC11.cpp |
| . . . void PiC11::Window_Open(Win::Event& e) { this->btStop.Enabled = false; } void PiC11::btRun_Click(Win::Event& e) { this->timer.Set(1, 1000); this->btRun.Enabled = false; this->btStop.Enabled = true; this->EnableCloseButton(false); this->cancel = false; this->progress = 0.0; this->valuePi = 0.0; stopwatch.Start(); th = std::thread(ComputePi, hWnd, std::ref(cancel), std::ref(progress), std::ref(valuePi), std::ref(cs)); } void PiC11::btStop_Click(Win::Event& e) { cs.lock(); cancel = true; cs.unlock(); } void PiC11::Window_Timer(Win::Event& e) { //___________________________________________ 1. Thread communication double prog = 0.0; double pi = 0.0; cs.lock(); prog = progress; pi = valuePi; cs.unlock(); //___________________________________________ 2. Display progress wchar_t text[256]; stopwatch.GetProgressInfo(prog, text, 256); this->Text = text; //___________________________________________ 3. Display value of pi so far _snwprintf_s(text, 256, L"%.15f", pi); tbxResult.Text = text; } void PiC11::ComputePi(HWND hWnd, bool & cancel, double& progress, double& valuePi, std::mutex& cs) { double sum=0; const size_t maxIterations = 1000000000; for (size_t i =0, j = 0; i < maxIterations; i++, j++) { //___________________________________________ 1. Perform calculation if (i%2 == 0) sum += (1.0/(2*i+1)); else sum -= (1.0/(2*i+1)); //___________________________________________ 2. Thread communication if (j == 10000) { j = 0; cs.lock(); valuePi = 4*sum; if (cancel == true) break; progress = (100.0*i)/maxIterations; cs.unlock(); } } ::PostMessage(hWnd, WM_APP, (WPARAM)0, (LPARAM)WORK_ID); // Notify the main thread that we are done! } void PiC11::Window_App(Win::Event& e) { if (e.lParam == WORK_ID) { //____________________________________________ 1. Worker thread has completed this->timer.Kill(1); // Stop the timer th.join(); this->btRun.Enabled = true; this->btStop.Enabled = false; this->timer.Kill(1); // Stop the timer this->Text = L"Done"; this->EnableCloseButton(true); //____________________________________________ 2. Display value of pi wchar_t text[256]; _snwprintf_s(text, 256, L"%.15f", valuePi); tbxResult.Text = text; // _snwprintf_s(text, 256, L"%.1f sec", stopwatch.GetSeconds()); this->Text = text; } } |